So 2020 was super long, but I was pretty busy with figuring out new ways to teach while maintaining social distance. Luckily we got some help in the form of new technology.
This is a google slideshow I made to help educate ALTs and friends about the new Denshi Kokuban in classrooms. I used VRM models and OBS software to make the instructional videos.
This is a lesson I made for 3 year students. They have a target grammar structure they have to use, but they also need to use simple English to figure get information they may be missing.
No lesson plan for this, and the materials can be used in a multitude of ways besides this game in particular.
My 3rd years are lower level than is normal, but they still enjoyed the physical aspect of going from group to group asking for information.
This is a video of a slide show I made to instruct how to do this activity to the students. And you can also download the presentation if you use projectors or TV’s in your classroom.
This is an 11 page document. The first 10 pages all have 7-8 characters named, but all 10 are unique. Each character appears on 2 different pages. I have 9-10 groups in my third year classes this year. If you don’t have 10 groups then one page can be discarded without thought and all the characters will have at least one page with their names on it. Once you discard a second or third page you have to be careful that the discarded pages don’t feature the same named characters.
The 11th page is a master copy containing all character names. You can disregard the entire “Information gap” concept and just print this master copy for all the groups if you want. It is intended to be used by the teachers when checking the student’s answers.
PDF is the safest to print now. The word docs are there if you want to adjust things or rename things yourself.
Do you write your own lesson plans? At some point I was asked to write a lesson plan for the first time. And probably because I didn’t and don’t really teach off of already written lesson plans, I had no idea what a lesson plan would look like. I’m sure my first attempt was a mess. Just because you can do something well, doesn’t mean you can write a How To set of instructions to help someone else do it…
Like… it’s not hard to do it poorly…
So as someone who occasionally has to help “train” ALTs, and I use the word “train” extremely loosely, this year I was flooded with lesson plans. I’ll be honest… I didn’t look past the basic design of any of them. My brain just shut off when I opened them all up, they were such a hodgepodge of different styles it made me cringe. But that’s not because they were written badly or by people who don’t know how to make lesson plans. I’m sure they were all wonderful… Just it’s hard to look at something and judge scores of them when all of them are all different looking. It’d be like having a dog competition, but your definition of dog is anything that has 4 legs and and fur.
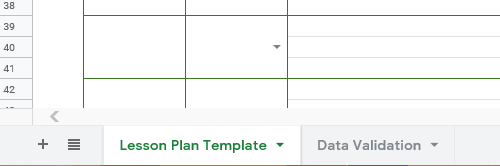
It’s a google sheet. There are 2 sheets included. The first sheet is the lesson plan template itself with some instructions on how to get started. The second is a ‘data validation sheet’ that also comes with instructions on how to use it.
Bottom left to swap between the two. In the event you’ve never used Google Sheets or Excel. Has to be some of you, we all start from somewhere.
I hope it proves helpful for when you want to make your own lesson plans in the future. I would suggest that my own company adopt a standardized procedure in the future, but my suggestions are received about as well as Firefly was by Fox executives.
So… in the “social-distancing” era of ESL teaching how are you adapting?
Personally… I didn’t go back to teaching in classrooms until June 1st. You’d think I’d have a long time to strategize how to approach lessons going forward… but I also have a toddler. Excuses aside though I have massively changed my teaching style.
Really… every parent had very realistic expectations about working from home…
The teaching style that I developed over my time in Japan was centered on student’s teaching each other. Lots of group work and communication activities. I liked letting students get an objective that required them to get more information via verbal communication. So they would form questions, ask those questions, and then record what they learned. Then they would disseminate that data and share it.
Buuuuut… group work is not an option. Students are allowed to work in pairs, but desks have to remain around 60cm apart from each other. To be frank I think it is unnecessary. All the students are wearing masks. If we have COVID spreading the current precautions we are taking probably aren’t going to halt its spread. Students still hang on each other during breaks. They still talk in close groups and touch each other. They have to remove their masks to eat. They walk home together. They play and hang out after school and on weekends. I digress.
yeah… baby
With the social distancing handicap I’ve moved on towards using the very thing I’ve railed against for years. PowerPoint.
Now I’ve covered my issues with PowerPoint before and I won’t rehash those now. (Full disclosure I totally did write a lengthy rehashing, then read it, realized I probably have unhealthy issues and the 4 of you who will actually read would be bored so I deleted it…) But for all the problems I have with PowerPoint it can be an extremely useful tool, if used right.
Can I get this icon in cornflower blue?
I make heavy use of animations in my PowerPoint presentations. Here are some that I’ve made with corresponding worksheets. Basic premise is making activities based on Japanese quiz/game shows in style. So far student participation is 100%, though only because I make each row stand up. I don’t love these lessons, but the kids enjoy them so far and while speaking and active communication time is drastically cut only because 1 on 1 and conversation within groups are now not possible given the parameters necessitated by COVID19.
My 3rd year students missed the last month of school so the teacher asked me for an activity for them to practice using passive voice as it was confusing them. TBH I dislike passive voice and I think it’s importance is overstated by Japanese English curriculum.
Starting off we warmed up with this passive voice quiz. Students all stand. I read the verbs and they would raise their hands to say either the past tense past participle. Then I would reveal the answer by rolling the animation and the students would write it on their worksheets. After students answered we would play Rock-Paper-Scissors and if they won then they could pick a friend to sit down. If they lost then only the student who answered could sit.
Next is the quiz/game/activity PowerPoint. If you run through the slideshow it’s easy to see how I ran the activity because I explain it visually in the PowerPoint.
TL:DR My schools want to keep track of the lessons I’m teaching, my company wants the schools to fax them schedules. Trapped in the middle, I came up with an unofficial solution that makes me happy, but due to technical reasons I don’t use it, but you can take a look if you want.
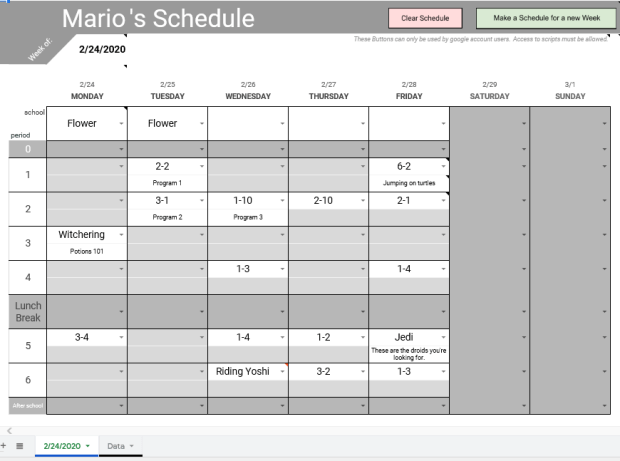
This doesn’t seem like something you should have to think about, right? Your company and the school/BOE should be figuring this out and letting you know. But I got tired of being asked to be the middle man between my schools and my company. So I made an online schedule using Google sheets. Now the teachers could adjust my schedule weeks in advance. And my coordinator could see this in real time. If we used this then I’d no longer be being asked to tell the teachers to fax my schedule to my coordinator so she can email me a picture of the fax… But I was told that this would not work for the current system. So officially, I don’t use this myself.
I’ve removed all the Japanese from this schedule, so that it is potentially usable for any teacher in any country. There are many notes littered around the schedule to help guide you in its use. You can remove the notes whenever by right clicking the cell. First here is the schedule: ALT Schedule.
Open it, and then save a copy to your own drive. You will need a google account to do this, but using the schedule itself won’t require any account or sign in. Just adjust sharing settings so anyone with a link can edit.
Main points
The schedule is customizeable.
The schedule is stored on the cloud and can be viewed and/or edited by multiple parties.
How to customize
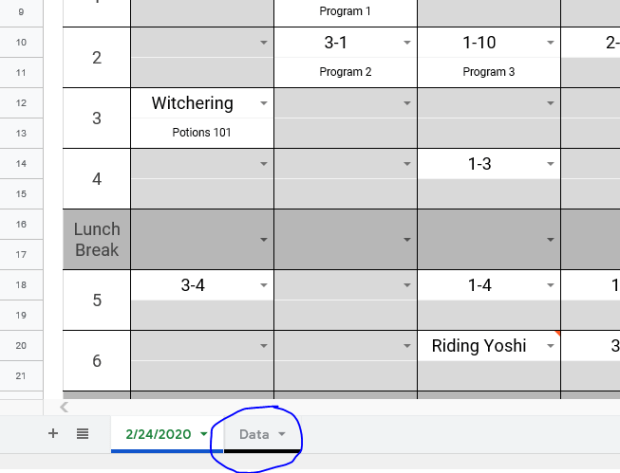
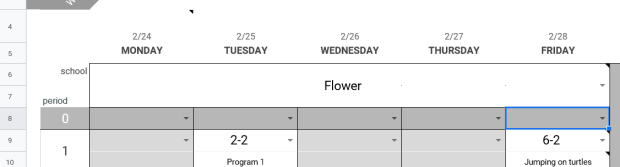
First step. Go to the Data tab on the bottom left hand corner.
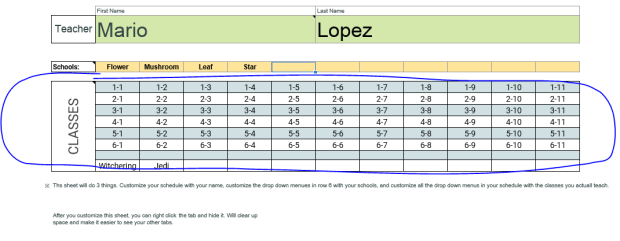
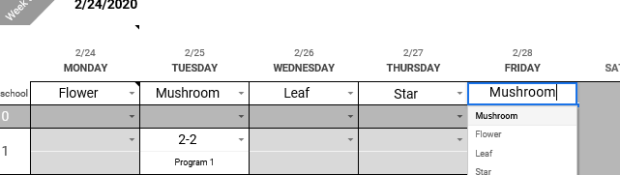
On the Data sheet enter in your Name, your school names, and the classes you normally attend. This will adjust your schedule by putting your name at the very top, the drop down menus in row 6 will have all of your schools, and your schedule drop down menus will be your commonly used classes. If you have less classes than I provided just select the cells with the classes you won’t ever use and press backspace on your keyboard. If you have a special needs class or something you often do like a conversation class, test prep, potion mixing, or something then manually input it and it will be added to your drop down menus. If your classes use a different ordering system, like Grade 1 Class A, Class B, Class C, etc. etc. etc. then you will have to clear the table and put in 1-A, 1-B, 1-C. The bottom line is whatever you put into the sheet in the classes menu will then appear on your schedule in the drop down menus.
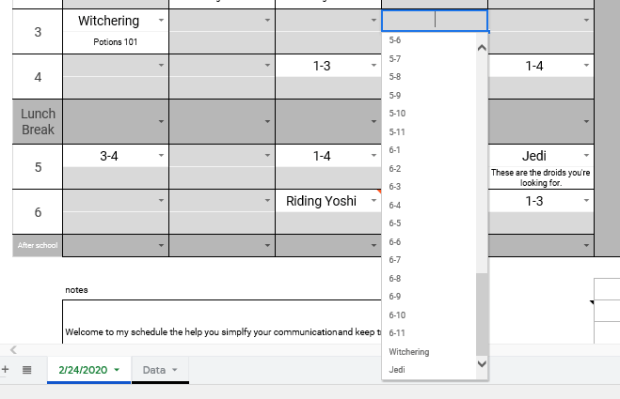
You’ll note I added Witchering and Jedi to the classes.
That will add them to my drop down menus on my schedule.
Keep in mind that the drop down menu items are set to appear in horizontal order on the Data sheet. I know that sounds confusing, but what it means is if you were to write your classes on the Data sheet like this:
1-1
2-1
3-1
4-1
1-2
2-2
3-2
4-2
1-3
2-3
3-3
4-3
Then the drop down menues would look like this:
1-1
2-1
3-1
4-1
1-2
2-2
3-2
4-2
1-3
2-3
3-3
4-3
If that’s how you would like the drop down to appear you can customize your classes like that, but it doesn’t make sense to me.
The cells under the drop down menus on your schedules are blank. You can write short memos here about the class contents. For more in-depth information, if you need to, can be written as a note or comment by right clicking the cell you wish to attach a note or comment to. Notes will pop up when your cursor hovers over the cell. Comments are unique because they will alert anyone who has a google account connected to the schedule and will also add a number to the sheet tab to denote how many comment threads are on the sheet. Comments can also be used to carry out conversations between users.
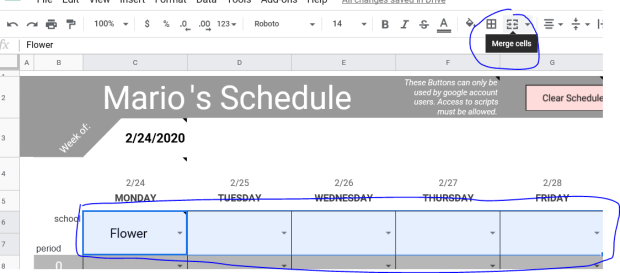
On your schedule you can merge and unmerge you cells in row 6 depending on how your schedule is arranged. For example, I go to one school per week, so I merge the 5 cells of row 6 like this.
Use the same button to unmerge the cells, but be careful. The school cells are actually rows 6 and 7 cells merged together. I did this in the event that a user may go to 2 different schools in one day. You can unmerge the single day and then you have 2 school cells for that day. But when you merge multiple days and then unmerge them, all of the cells will revert to being separated by both rows and columns. So you’d have to remerge them if you wanted. It’s more of an aesthetics thing.
The other ALT in my town has 3 schools that he goes to every week. School 1 he goes to on Monday and Tuesday, School 2 he goes to on Wednesday and Thursday, and School 3 he goes on Friday. He could merge the row 6 cells under Monday and Tuesday together, and do the same to the cells under Wednesday and Thursday.
Customize it to make it useful. If you have a very random schedule that varies from week-to-week just leave all the cells unmerged and fill in each day individually, it doesn’t take much time.
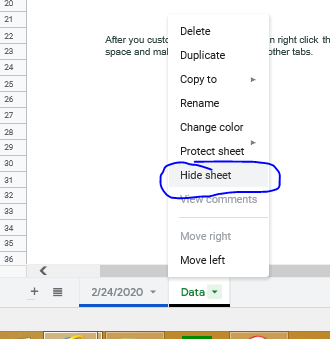
After you finish customizing your Data sheet I suggest you hide it.
Hidden sheets can still be accessed, but it’s not something you want to change often.
I hide my weekly schedule sheets after the week is over. It keeps the current week as the top sheet, and reduces the number of tabs I have to comb through. But, if i want to look back and previous weeks I still can.
Next Week
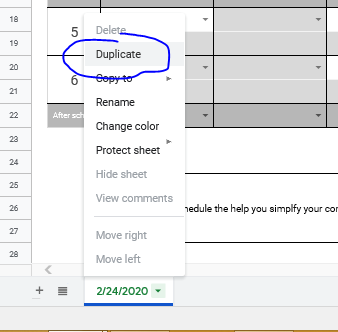
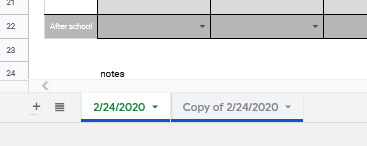
To make a new sheet for your next week of work is simple. Right click the tab of the sheet you wish to duplicate and the option pops up.
This will create an exact copy.
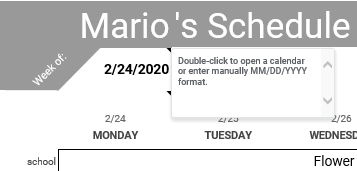
Switch to the copy, and change the date in Cell C3.
This will automatically update all dates and days on the the sheet. Double click the Copy of “ “ sheet tab at the bottom to rename it to the new start date. Select all the Cells and hit backspace on the keyboard to clear the classes and schools if you want.
Push My Buttons
I did make some buttons at the top of the schedule, but to use them you’ll have to allow the Google scripts access to your google account. It is the same as when using Microsoft Excel and enabling macros. The reason that Google warms you that that script is potentially dangerous is because they do not have control over what scripts people write. It’s like a company selling pens, but putting warnings on the pens that their company isn’t responsible for what the pens are used to write or draw. That being said running unknown scripts on your computer is a lot more dangerous for your computer than a pen someone’s using to write shitty Twilight fanfic. So I have actually removed all the script from this schedule. If you want to use these handy buttons then you’ll have to implement it yourself. Either way it will ask you for permission to run the scripts, but this way you can actually see what you’re running and know that I’m not some bored hacker trying to steal all your cat meme ideas.
I’m prouder of this than I should be…
In Cell J2 I have stashed this script:
function NewSheet() {
  var spreadsheet = SpreadsheetApp.getActive();
  spreadsheet.getRange('A1').activate();
  spreadsheet.duplicateActiveSheet();
  spreadsheet.getRange('C6:I22').activate();
  spreadsheet.getActiveRangeList().clear({contentsOnly: true, skipFilteredRows: true});

  };

function ClearSheet() {
  var spreadsheet = SpreadsheetApp.getActive();
  spreadsheet.getRange('C7:I22').activate();
  spreadsheet.getActiveRangeList().clear({contentsOnly: true, skipFilteredRows: true});
};
These are the two functions you need for both buttons. One is named NewSheet and the other is named ClearSheet. In the merged Cells G3-I3 I have detailed instructions on how to copy and paste this script to use it.
If you prefer you can record your own macros though. These instructions are in Cell J3.
These two buttons already have the scripts assigned to them under NewSheet and ClearSheet. So copy pasting or recording macros under these names will make the buttons work automatically. With a single click of the mouse you can clear all of your scheduled classes or make a new blank sheet for next week. But if you don’t want to use these buttoms right click to select and delete them.
Sharing the Schedule
So who you share your schedule with is up to you. Because I made this and my company did not, technically it’s not company policy. But both my coordinator and my teachers were initially happy with the conceptMost teachers are tech savy enough to appreciate the simplicity and ease of use. Honestly, they’re just relieved to not have to print out the schedule and fax it every week. Elementary schools are different because schedules are more rigid and set, but JHS the class schedules tend to change randomly and often. I don’t get a finalized schedule until mid week sometimes. And daily changes are the norm. I keep a written schedule on my desk for all the teachers to see, but the using an online schedule would let me update changes in real time so my company could see. You could even put a shortcut to the schedule on a school computer to make it easy for the teacher to access.
You can email the link to the teacher of course. I usually shorten the link with TinyUrl or something. But if internet access is restricted then emails might not work. If this is the case I shorten the link with TinyUrl. Then just type the link in the browser. Alternatively, you could type the link on a Word doc, save it to USB. Then open the doc on the computer and Ctrl+click the link to open your schedule.
To make the shortcut on the desktop just click and drag the icon in the URL bar to the desktop and then rename it.
If you can help me with my Java. I would like for the NewSheet script to also advance the date and rename the sheet. I cannot figure out how to make it advance the date though… I have gotten the sheet auto rename to work though.
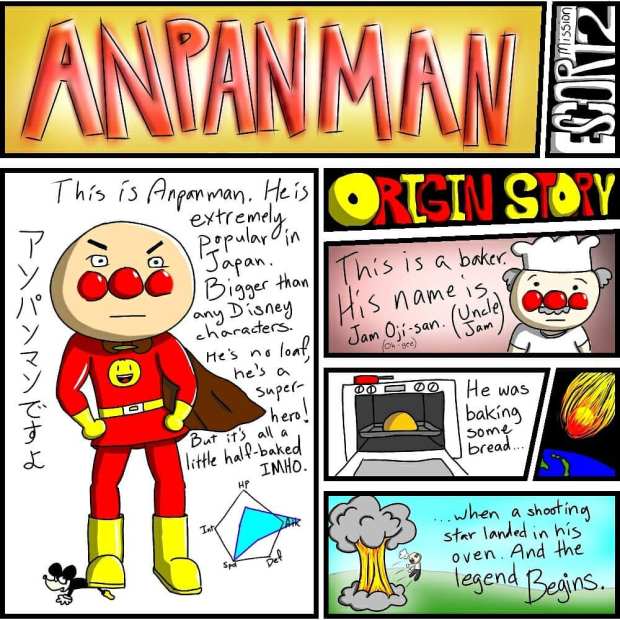
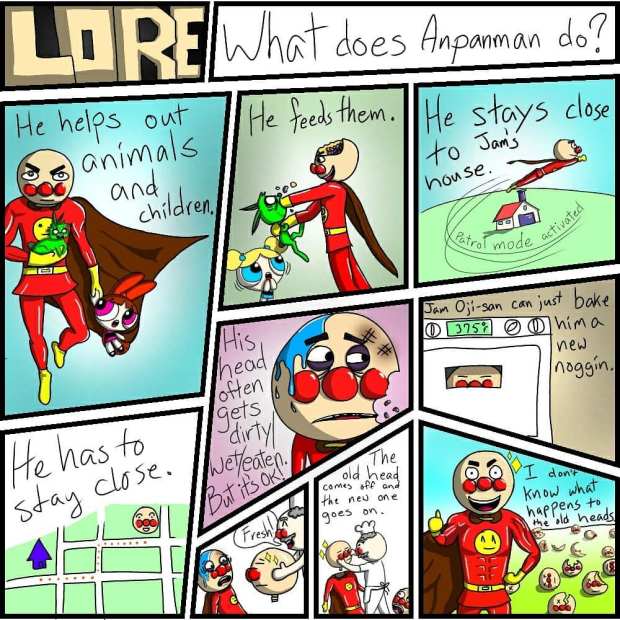
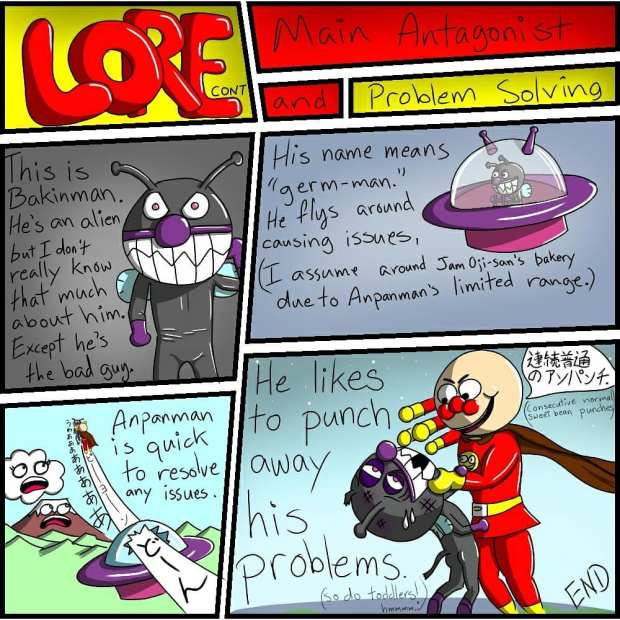
I really love Anpanman. It’s really pretty deep if you think about the premise. He’s not a great overpowered hero, but he is kind. He has strength and can fly, but his greatest power is giving up bits of himself to help and comfort others, all the while growing weaker in the process.
He’s also really easy to draw. It gives me flashbacks to my doodles of Kenny in my JHS notebooks many many year ago. My students really enjoyed my funny verisons of the bean stuffed crusader so I use him for a lot of illustrations. You’ll see him often in my games and worksheets, and my overall sense of humor follows a very evident pattern that I inherited from my father and growing up in the 90’s.